Armanino Blog
Article

How to Receive POs Using D365 Mobile Device Functionality

October 01, 2019

You can receive purchase orders using D365 for Finance and Operations (D365 F&O) mobile device functionality. The scanning process is easy to set up and can be very useful, as it offers accuracy on the transactions and can save a lot of time.

This post will cover the mobile device receiving process for items and warehouses that are set up for warehouse management. The standard mobile device functionality uses a two-step receiving process.

In the two-step process, the item is first received into a receiving location using the Purchase receive mobile device function. The second step of the process, Purchase put-away, moves the item from the receiving location to an inventory location.

These two mobile device functions are found under the standard Inbound mobile device menu. See below
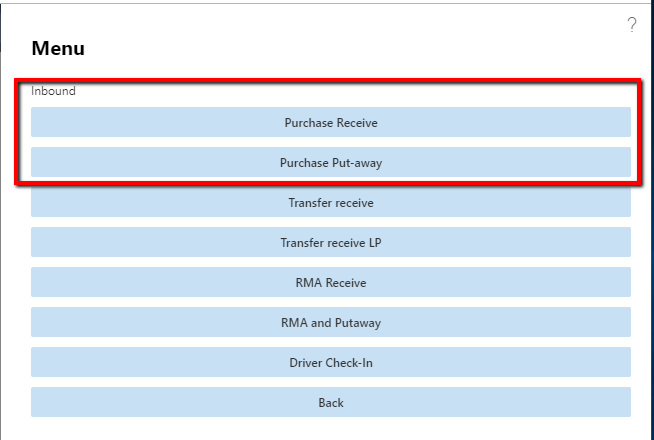
Receive POs Using D365 Mobile Device Functionality

In D365, the mobile device menus are found in the following menu path: Warehouse management > Setup > Mobile device > Mobile device menus.
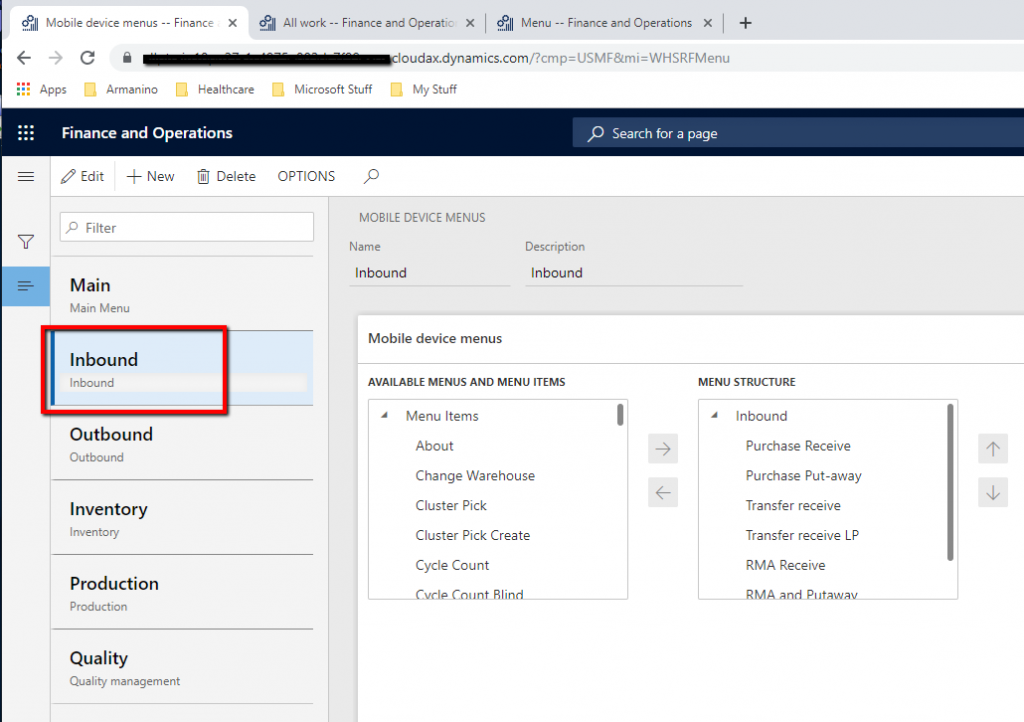
Mobile device menus

The mobile device functions are found and set up in the following menu path: Warehouse management > Setup > Mobile device > Mobile device menu items.

The Purchase receive function is set up as follows.
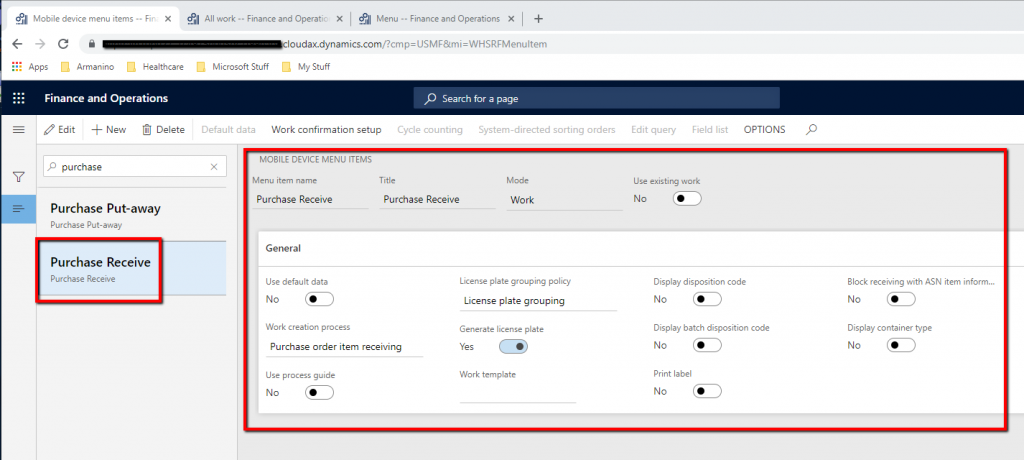
Receive POs Using D365 Mobile Device Functionality

The Purchase put-away function is set up as follows.
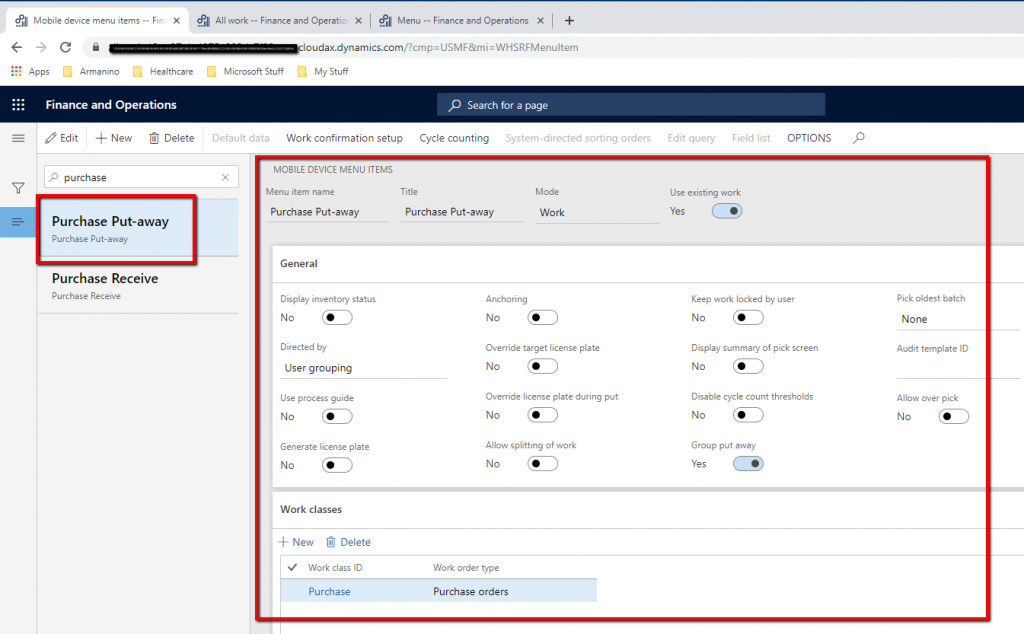
Purchase put-away function

Purchase Receive

The Purchase receive function lets the user register items on a purchase order to the default receiving location. The default receiving location is a staging area where a product is placed when the warehouse worker pulls the product off the trailer and stages it for put-away. The steps to complete this mobile device function are as follows:
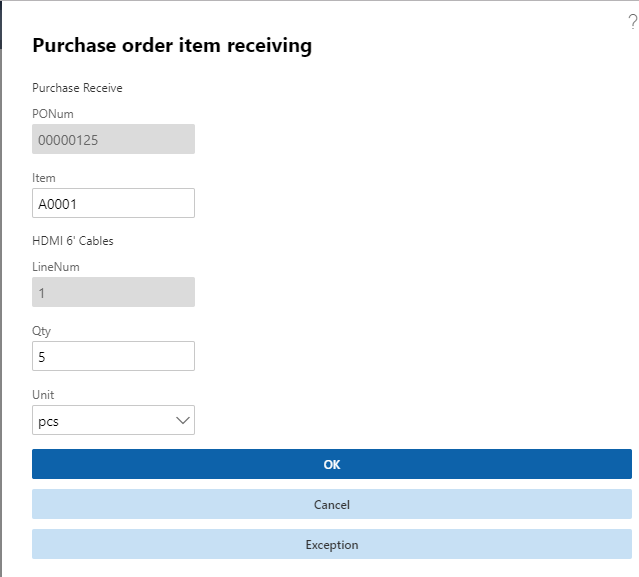
  • Enter the PONum of the item that is to be received and press the Enter key.
  • The Item field will appear and allow you to enter or scan in the item to be received. Hit the Enter key to continue.
  • In the Qty field, enter in the quantity to be received into the receiving location.
  • To register the item, click the OK button at the bottom of the form. This process also creates work of work order type "Purchase Orders".
Receive POs Using D365 Mobile Device Functionality

In D365, if you go to All purchase orders and find the PO and PO line, you should see that the quantity you entered displays as registered in the Line quantity form. The location of the registered item should also display in the On-hand inventory form as well.

Purchase Put-Away

Now that the item has been registered and is sitting in the receiving location, the next step is to move the item to an inventory location. This is the second step in the receiving process.

The Purchase put-away function allows the user to move the register items on a PO from the default receiving location to an inventory location. This step is done using the work that was created in step 1 above, Purchase receive. The steps to complete the Purchase put-away function are as follows:
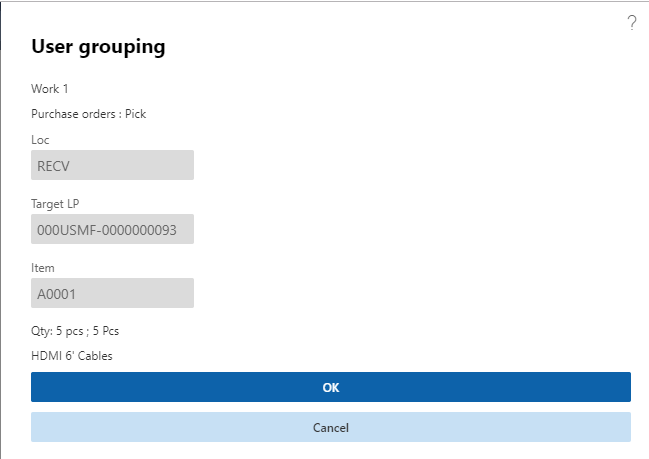
  • Enter the work ID of the item that is to be moved to an inventory location. To see the work ID to enter, navigate to Warehouse management > Work > All work in Dynamics 365. Find the PO and item that were registered in the Purchase receive function above. Enter the work ID for the record and hit the Enter key.
  • The screen will display the location of where the item is to be picked from as well as the license plate, item ID and quantity of the item to be picked. Notice the text "Purchase Orders: Pick" before the Loc field on the form. This indicates that we are on the pick step of the put-away. Click the OK button at the bottom of the form to indicate that the item and quantity have been picked from that location. See screenshot below
Receive POs Using D365 Mobile Device Functionality
  • The form will prompt you to enter or scan in another work ID or license plate ID. This is so that you can move more than one item from the receiving location to an inventory location. To indicate that you are ready to move the item(s) to inventory, click the Done button on the bottom of the form.
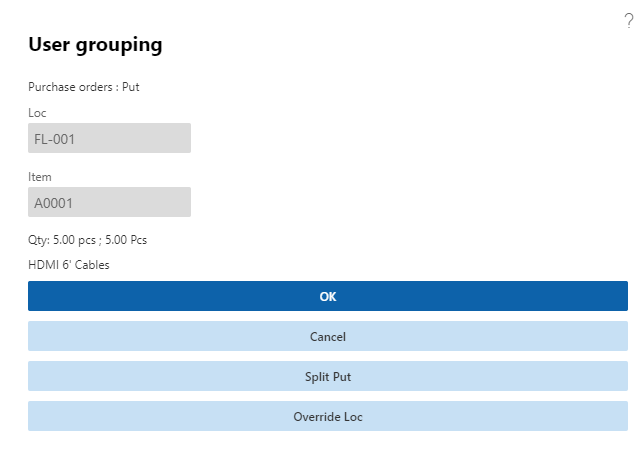
  • The next screen will display as follows.
Receive POs Using D365 Mobile Device Functionality
  • Notice the text "Purchase Orders: Put". This indicates that we are on the put step of the put-away process.
  • This screen also displays the location of where the item is to be placed into inventory in the Loc field. This value is determined by the query on the location directive. The function allows the user to split the put quantity to multiple locations or even override the Loc to a different location.
  • The screen also displays the item and quantity to be put away as well. To accept and put the item in the location displayed, click the OK button near the end of the form. This process will now place the registered quantity into the inventory location.
  • Upon completion, the screen will display a "Work completed" message in red at the top of the form, and will prompt the user for the next work ID to be put away. Click the Cancel button to exit the function and go back to the Inbound menu.

In D365, if you go to All purchase orders, find the PO and PO line and look at the On-hand inventory function, you should see that the registered quantity now resides in the inventory location that was displayed in the put-away function. The last step is to post a packing slip, in D365, on the purchase order for the registered quantity.

Posting the packing slip moves the quantity from registered to received and invoice remainder.

Find more helpful tips and tricks for using D365 F&O on the ArmaninoDynamics Blogor contact ushere.

Stay In Touch

Sign up to stay up-to-date with the latest accounting regulations, best practices, industry news and technology insights to run your business.

Resources
Related News & Insights
The Complete Guide to Working With a Marketing Agency: Unlock Your Business Advantage
Article
Explore what marketing agencies do, types of marketing agencies, pricing and best practices for working with an agency.

December 13, 2024
Nonprofit Fundraising Checklist: Essential Best Practices to Drive Donations Year-Round
Article
Deploy these infrastructure must-haves and key metrics to maximize your fundraising.

December 11, 2024
Want to Thrive in the AI Era? Unify Your ERP and HR Systems
Article
The question: do you stay with a best-of-breed approach or move to an all-in-one system?

December 10, 2024